MAZDASPEED Oil Cooler how-to
by Edwin Man
Copyright © 2003 Edwin Man. All rights reserved. No
reproduction by any means permitted.
The following are instructions on installing the
MazdaSpeed water cooled oil cooler for the 1998+ Mazda FP 1.8l and FS
2.0l engines. Older engines are incompatible.
Required time: 3-5 hours
Required tools:
- basic metric socket wrench set with assorted extensions and
at least one swevel joint
- 29mm deep well socket
- 29mm crescent wrench (two prefered)
- basic metric combination wrench set
- pliers
- 75ft lbs torque wrench
- 150in lbs torque wrench
Required parts:
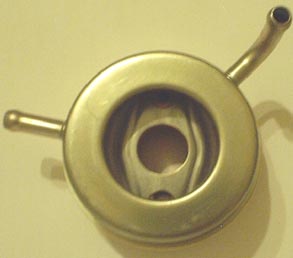
- FS05-14-700 oil cooler
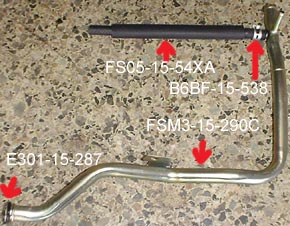
- B6BF-15-538 water hose clamp (need 4)
- FS05-15-54XA oil cooler water return hose
- FS05-15-536A oil cooler water inlet hose
- 9992-22-000 nut (need 2, 1 will be useless at the end of
installation)
- FSM3-15-290C water bypass pipe
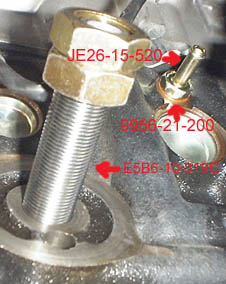
- JE26-15-520 oil cooler water inlet tap (use 0000-88-C77 if installing with MAZDASPEED turbo kit)
- 9956-21-200 gasket washer (2 needed if installing with MAZDASPEED turbo kit)
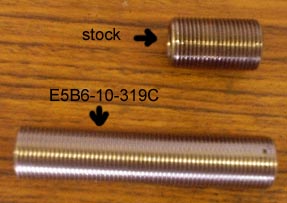
- E5B6-10-319C oil filter adapter pipe
- E301-15-287 water bypass pipe o'ring
- FS01-13-460A exhaust manifold gasket
- ZM01-20-520 exhaust manifold exit flange gasket
- motor oil
- antifreeze
- distilled water
Basic disclaimer: work carefully and take your time. If you screw
up, it's your fault. If you don't have some mechanical experience,
please have a professional install this oil cooler for you! This
installation is definately not for beginners!
1. Drain the oil and remove the oil filter (if you don't know how to do
this, stop right here and have a professional do this installation for
you!)
2. Drain the engine coolant
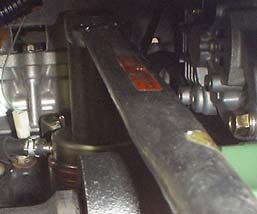
3. Remove the intake manifold support bracket located between the oil
filter area and the starter by removing the four 14mm bolts
4. Using a shield of some sort in front of you, remove the 17mm bolt
installed at the top right corner of the engine block immediately next
to the alternator. Coolant will spray everywhere when you remove the
plug!
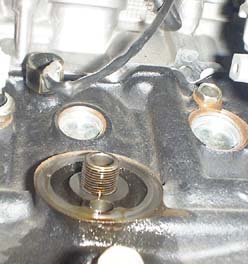
5. Place two nuts onto the oil filter mount from the bags labeled with
part number 9992-22-000
6. Using two 29mm crescent wrenches, tighten the two nuts on top of
each other by turning the two wrenches in opposite directions
7. Slowly turn the top nut to remove the oil filter mount threaded
pipe. Retighten the bottom nut from the top nut when necessary. Remove
and save the nuts for later use.
8. Install the coolant line tap from the bag labeled with part number
JE26-15-520 while fitting the copper gasket 9956-21-200 in between into
the block using a deep well 17mm socket wrench. Torque it to 14-16ft lbs.
9. Carefully install the new oil cooler mount threaded pipe from the
bag labeled with part number E5B6-10-319C into the engine block until
you can turn it no further by hand
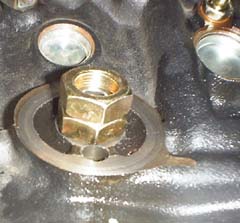
10. Place the two nuts (9992-22-000) onto the end of the new oil filter
mount
11. Using two 29mm crescent
wrenches, tighten the two nuts on top of each other by turning the two
wrenches in opposite directions
12. Slowly turn the top nut about 1/8 turn to tighten the oil filter
mount threaded pipe. Remove and save the nuts for later use.
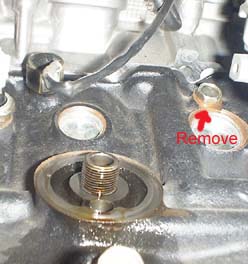
13. Working from the top of the engine bay now, remove the heater
coolant line and the throttle body coolant line from the metal coolant
by-pass pipe located at the transmission side of the engine. You may
have to remove the air intake hose to have working space. The coolant
by-pass pipe can be seen just below the coolant split off block mounted
at the side of the engine.
14. Remove the 14mm bolt that fastens the coolant by-pass pipe clamp
onto the coolant split off block
15. Disconnect the primary oxygen sensor from the harness
16. Remove the exhaust manifold heat shield
17. Remove the exhaust manifold
18. Remove the 14mm bolt from the coolant by-pass pipe bracket
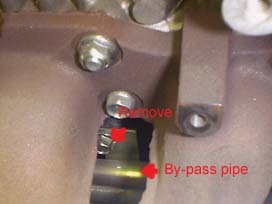
19. Pull the coolant by-pass pipe away from the thermostat housing with
a slight twisting motion
20. Remove the new coolant by-pass pipe (FSM3-15-290C) from the bag and
install the rubber o-ring (E301-15-287) to the end of the pipe.
21. Slide one water hose clamp (B6BF-15-538) into the coolant line
(FS05-15-54XA) and fit the coolant line into the additional coolant line
fitting found on the new coolant by-pass pipe. Pull the retaining clip
from the water hose clamp with a pair of pliers to fasten the clamp onto
the coolant line.
22. Remove the coolant by-pass pipe clamp from the stock by-pass pipe
you have just removed and slide it into the same position on the new
by-pass pipe
23. Lubricate the rubber o-ring on the new coolant by-pass pipe with
some coolant you have just drained. Slide the new coolant by-pass pipe
into the thermostat housing while making sure the installed coolant hose
goes around the back side of the engine and not letting anything catch
on the whole assembly.
24. Reinstall the two 14mm bolts to resecure the coolant by-pass pipe.
Torque both of those bolts to 14-18ft lbs.
25. Replace the exhaust manifold gaskets while making sure the surface
is smooth and clean
26. Reinstall the exhaust manifold. Torque all the fasteners
14.5-20.9ft lbs.
27. Reinstall the heat shield. Torque the four 10mm bolts to
69.5-95.4in lbs.
28. Reconnect the oxygen sensor to the harness
29. Reconnect and refasten the throttle body and heater coolant hoses
30. Reach and grab the new coolant hose coming from the side of the
engine and point it toward the oil filter mount. Be sure to route the
line below the oil pressure sensor and wires.
31. Remove coolant hose from the bag labeled with part number
FS05-15-536A and slide a water hose clamp (B6BF-15-538) into the longer
end of the U-shaped coolant hose. Insert the coolant hose with the water
hose clamp slid on into the coolant line tap (JE26-15-520). Do not
secure the coolant line yet.
32. Lightly coat the gasket end of the oil cooler with some normal
motor oil and insert the oil cooler through the new oil filter threaded
mount pipe
33. Slide a water hose clamp on each of the two coolant lines that run
to the oil cooler and the insert the two coolant lines into the oil
cooler
34. Align the oil cooler position by making sure that the stamped
letters at the bottom lip of the oil cooler points downwards and then
pull the retaining clips from the water hose clamps to secure the
coolant hoses
35. Install the one big 29mm nut (9992-22-000) to fasten the oil cooler
in place. Before final tightening, be sure to realign the oil cooler
position once more. Use a deep well 29mm socket wrench to tighten.
Torque the nut to 22-28ft lbs.
36. Inspect everything around the oil cooler area to ensure there will
be no problems later
37. Install a new oil filter. Aftermarket V6 engine oil filters are not
guaranteed to fit.

38. Refill engine with oil
39. Refill radiator with proper mixture of coolant
40. Start engine and inspect for any leaks before driving the first
time after installation