TSB: 01-002/07

2003 PROTEGE - MAZDASPEED - WHISTLE NOISE AT IDLE, FUEL CUT UNDER BOOST, MIL ILLUMINATED, DTC P0171 SET

NOTE: This bulletin replaces 01-034/06. Please update your records accordingly.

BULLETIN NOTE

APPLICABLE MODEL(S)/VINS

2003 MAZDASPEED Protege

DESCRIPTION

Some customers may experience one or more of the following conditions:

The above mentioned conditions may be the result of a ruptured waste gate actuator diaphragm. To determine if this is the cause follow the repair procedure as described below.

REPAIR PROCEDURE

WARNING:

NOTE:

1. Verify customer concern.
2. Inspect waste gate actuator (TURBOCHARGING BOOST PRESSURE INSPECTION) according to Workshop manual section [01-13B TURBOCHARGING SYSTEM INSPECTION FS WITH TC].

NOTE:

3. Remove compressor outlet to intercooler inlet duct.
  1. Loosen clamp at intercooler.

  2. Raise heat protective sleeve.

  3. Loosen clamp at compressor discharge.

  4. Slide spring clamp for Air Bypass Valve (ABV) hose backward off of duct nipple.

  5. Slide ABV hose off of duct.

  6. Remove duct.

    • Remove from turbocharger first.

    • Remove from intercooler second.

  7. Cover turbo outlet and intercooler inlet to keep out foreign objects.

4. Remove compressor inlet to mass air flow sensor duct.
  1. Loosen clamp at MAF sensor.

  2. Slide spring clamp forward on ABV, remove ABV from duct and place off to the side.

  3. Remove valve cover breather hose.

  4. Disconnect electrical connector halves for reverse light switch and then remove the connector body from duct.

  5. Loosen clamp at compressor inlet.

  6. Unclip fuel line from retainer on duct.

  7. Remove air filter box lid by disconnecting electrical connectors from MAF & Inlet Air Temperature sensor.

  8. Remove retainer holding wires to air box lid.

  9. Unlatch the two latches, lift hinge lid up and remove from the duct by rocking back and forth while pulling.

  10. Remove duct from compressor inlet.

  11. Cover turbo inlet to keep foreign objects out.

5. Remove waste gate actuator.
  1. Remove clamp holding oil feed line to water lines.

  2. Remove and discard oetiker clamp holding boost signal line to waste gate actuator. A new clamp is included in the kit.

  3. Disconnect line from waste gate actuator.

  4. Raise vehicle and suitably support.

  5. Remove clip holding actuator arm to waste gate lever.

  6. Release actuator arm from waste gate lever.

  7. Remove lower nut holding actuator to bracket.

  8. Lower vehicle.

  9. Remove upper nut holding actuator to bracket.

  10. Remove actuator, oil feed line may need to be moved out of the way.

6. Replace waste gate actuator.
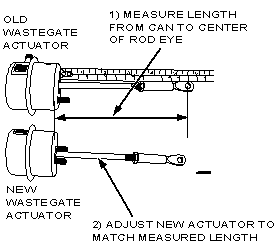
  1. Measure length of rod on new and old actuators, measuring between rod eye and flat side of actuator can.

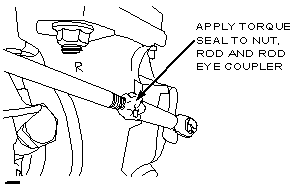
  2. Adjust new actuator rod length to equal old actuator rod length and then apply Torque Seal to the tightened nut.

  3. Install actuator (holding oil line out of the way will ease installation).

  4. Ensure the heat shield is between actuator and mounting bracket and signal line is pointing down.

  5. Install and tighten the nut holding the top of the actuator. Apply Torque Seal to the nut.

  6. Raise vehicle and suitably support.

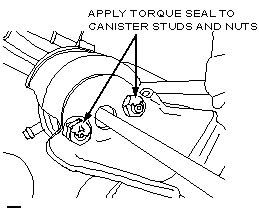
  7. Install and tighten the nuts holding the actuator canister to the bracket. Apply Torque Seal to studs and nuts.

  8. Pull actuator arm forward to connect to waste gate lever.

  9. Reinstall retaining clip to secure actuator arm to waste gate lever. Apply Torque Seal to this joint.

  10. Reconnect boost signal line to actuator using a new service clamp.

  11. Install clamp on oil and water lines in witness marks on lines.
7. Reinstall compressor inlet duct.
  1. Install compressor inlet to MAF duct, do not tighten clamps until both ends are aligned.

  2. Install air box lid/MAF.

  3. Reconnect fuel line into clip on duct.

  4. Reconnect reverse light connection onto duct.

  5. Reconnect reverse light electrical connection.

  6. Reconnect valve cover breather hose.

  7. Reconnect electrical connections to MAF & IAT sensors.

  8. Reconnect wiring harness retainer to air box.

  9. Align compressor inlet to MAF duct, making sure there is adequate clearance between it and the intercooler to throttle body duct.

  10. Torque clamps to 66 lb. in.

  11. Install ABV onto nipple on compressor inlet duct, do not clamp yet.

8. Reinstall compressor outlet duct.
  1. Install compressor outlet to intercooler inlet duct.

  2. Torque clamps to 66 lb. in.

  3. Slide heat shield down compressor outlet to intercooler inlet duct, to cover bellows closest to turbo.

  4. Install ABV onto nipple of compressor discharge to intercooler inlet duct.

  5. Align ABV so that the top of the valve is level.

  6. Install spring clamps at both ends.

9. Verify/adjust boost level.
  1. Reconnect battery cable.

  2. Connect WDS can tool and ID vehicle.

  3. Run engine until operating temperature is reached.

  4. In a safe area, accelerate in 1st gear while lightly applying brakes with left foot.

  5. Continue opening throttle until it is wide open. Apply brake as needed to control engine RPM at 4,000 RPM.

  6. Using WDS snapshot function, record RPM, MAF, IAT, and ECT readings.

  7. The MAF reading target is 95 g/s (+/- 5 g/s). If not within specification, the rod length needs to be adjusted.

    • To increase boost, make the actuator rod shorter.

    • To decrease boost, make the actuator rod longer.

NOTE:

10. Verify repair.

PART(S) INFORMATION


Part Number

Description

Qty.

Notes

0000-88-C96

Waste Gate Actuator Kit

1

Includes: actuator, Red anti-tampering laquer (Torque Seal), installation instructions

WARRANTY INFORMATION

NOTE:


Warranty Type

A

Symptom Code

D5

Damage Code

AD

Part Number Main Cause

0000-88-C96

Quantity

1

Operation Number / Labor Hours:

YY394XRX / 1.0 Hrs


Copyright © Mazda North American Operations