This bulletin supersedes the previous bulletin issued on 03/01/07. The APPLICABLE MODEL(S)/VINS has been revised.
2007 Mazdaspeed3 vehicles with VINs lower than JM1BK******711636 (produced before February 5, 2007)
2006-2007 Mazdaspeed6 vehicles with VINs lower than JM1 GG******109403 ( produced before February 26, 2007)
2007 Mazda CX-7 vehicles with VINs lower than JM3ER******163410 ( produced before February 26, 2007)
On some vehicles, the MIL comes on with DTC P2006 stored in memory due to the variable swirl shutter valve actuator sticking intermittently in cold weather. This is caused by inadequate spring force in the actuator. To ensure the valve opens, the spring force of the actuator has been increased since February 5, 2007 on all vehicles. The DTC detection logic under extremely cold conditions has also been changed since February 2, 2007 on Mazdaspeed3 and since February 26, 2007 on Mazdaspeed6 and CX-7.
IMPORTANT: DO NOT alter or modify any portion of the throttle sensor switch.
1. Verify customer concern.
2. For all vehicles produced before February 5, 2007 with the following VINS, replace the variable swirl shutter valve actuator:
2007 Mazdaspeed3 vehicles with VINs lower than JM1BK******711636
2006-2007 Mazdaspeed6 vehicles with VINs lower than JM1 GG******109239
2007 Mazda CX-7 vehicles with VINs lower than JM3ER******161650
3. For Mazdaspeed3 produced before February 2, 2007 and for Mazdaspeed6 and CX-7 produced before February 26, 2007 with the following VINS, reprogram the PCM:
2007 Mazdaspeed3 vehicles with VINs lower than JM1BK******710526
2006-2007 Mazdaspeed6 vehicles with VINs lower than JM1 GG******109403
2007 Mazda CX-7 vehicles with VINs lower than JM3ER******163410
1. Record the customer's radio presets.
2. Disconnect the negative terminal from the battery.
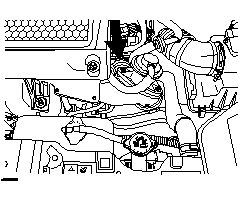
3. Remove the engine cover.
4. Disconnect the mass air flow (MAF) connector and remove the MAF harness from the clip on the air cleaner cover.
5. Remove the air cleaner cover.
6. Disconnect the vent hose from the air intake hose using the quick disconnect, then remove the air intake hose.
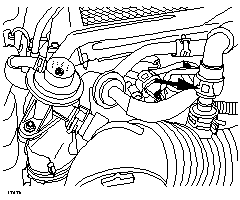
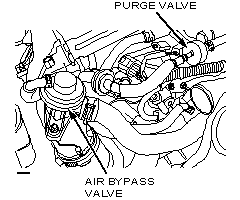
7. Disconnect the air bypass hose from the air bypass valve and the purge valve hose from the purge valve, then move the hoses up out of the way.
8. Disconnect the high pressure fuel spill valve connector.
9. Disconnect the hose from the clip on the wire harness bracket.
10. Remove the two bolts holding the wire harness bracket and move the bracket up and out of the way.NOTE: It is not necessary to remove the ground wire bolt or disconnect the connectors as shown.
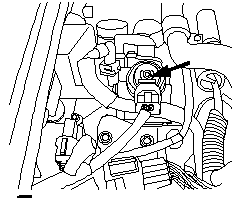
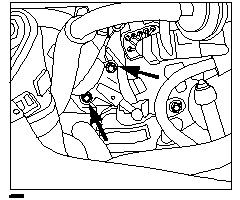
11. Remove the two bolts from the variable swirl shutter valve actuator.
12. Using a hair dryer (NOT a heat gun), apply approximately 176 oF (80 oC) heat onto the variable swirl shutter valve actuator ball joint for 3 minutes.CAUTION: Do not apply heat higher than 212 oF (100 oC) because it may cause damage to sensors.
13. Make sure the ball joint gets warm, then disconnect the joint.CAUTION: Do not use a tool to disconnect the joint, otherwise the plate could get deformed.
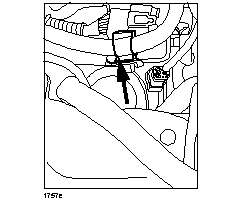
14. Disconnect the variable swirl shutter valve actuator hose, then remove the actuator from the vehicle.
15. Apply approximately 176 oF (80 oC) heat to the modified variable swirl shutter valve actuator ball joint for 3 minutes, then install the modified actuator.CAUTION: In order to prevent the plate from getting deformed, make sure to warm up the joint before the installation.
16. Re-assemble the parts in the reverse order of removal.NOTE: For proper alignment, connect the vent hose to the air intake hose before tightening the clamps for the air intake hose.
17. Verify repair.
18. Enter the customer's radio presets.
1. Reboot the IDS to clear memory before reprogramming.
2. Using IDS 47.5 or later software, reprogram the PCM to the latest calibration (refer to Calibration Information table) by following the Module Reprogramming procedure.NOTE:
Always update the IDS tool first, then follow on-screen instructions to download the needed calibration file for PCM reprogramming.
It is not necessary to remove any fuses or relays during PCM reprogramming when the IDS screen prompts you to do so. You may accidentally stop power to one of the PCM terminals and cause the PCM to be blanked, or you may receive error messages during the IDS reprogramming procedure.
IDS shows the calibration part numbers after programming the PCM.
Please be aware that PCM calibration part numbers and file names listed in any Service Bulletin may change due to future releases of IDS software, and additional revisions made to those calibrations for service related concerns.
When reprogramming a PCM, IDS will always display the latest calibration P/N available for that vehicle. If any calibration has been revised/updated to contain new information for a new service concern/issue, it will also contain all previously released calibrations.
When performing this procedure, we recommend that a battery charger be installed on the vehicle battery and turned ON to a maximum charge of no more than 20 AMPS to keep the vehicle battery up to capacity. If you exceed 20 AMPS, it could damage the VCM.
3. After performing the PCM reprogramming procedure, verify the repair by starting the engine and making sure there are no MIL illumination or abnormal warning lights present.NOTE:
If any DTCs should remain after performing DTC erase, diagnose the DTCs according to the appropriate Troubleshooting section of the Workshop Manual.
After PCM reprogramming, it is no longer necessary to road test the vehicle to relearn KAM (Keep Alive Memory).
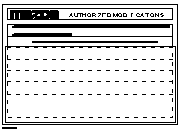
4. Fill out an Authorized Modifications label (P/N 9999-95-AMDC-97) with the new PCM calibration information, your dealer code, and today's date.
5. Place the Authorized Modifications label on the A pillar below the tear tag in the driver door jamb. The Authorized Modification label will inform technicians of the PCM calibration change if future repairs are necessary.
|
Part Number |
Description |
Qty. |
|
L3Y2-20-170 |
Variable Swirl Shutter Valve Actuator |
1 |
|
Vehicle |
Spec |
Trans |
New PCM Calibration Part Number |
File Name |
|
CX-7 |
CA |
A/T, FWD |
L33L-18-881R |
SW-L33LER000.HEX |
|
CX-7 |
CA |
A/T, AWD |
L33M-18-881R |
SW-L33MER000.HEX |
|
CX-7 |
Fed/Can |
A/T, FWD |
L33N-18-881R |
SW-L33NER000.HEX |
|
CX-7 |
Fed/Can |
A/T, AWD |
L33P-18-881R |
SW-L33PER000.HEX |
|
CX-7 |
Mexico |
A/T, FWD |
L39J-18-881D |
SW-L39JED000.HEX |
|
CX-7 |
Mexico |
A/T, AWD |
L39K-18-881D |
SW-L39KED000.HEX |
|
Mazdaspeed6 |
CA |
6M/T |
L38J-18-881E |
SW-L38JEE000.HEX |
|
Mazdaspeed6 |
Fed/Can |
6M/T |
L38K-18-881E |
SW-L38KEE000.HEX |
|
Mazdaspeed3 |
CA |
6M/T |
L34B-18-881G |
SW-L34BEG000.HEX |
|
Mazdaspeed3 |
Fed/Can |
6M/T |
L34C-18-881G |
SW-L34CEG000.HEX |
NOTE: The PCM Calibration Part Numbers listed above are provided for PCM reprogramming purposes only. These are not necessarily the same Mazda part numbers used to order an actual PCM through the Mazda Parts System. It is not necessary to order a PCM as part of this repair procedure.
NOTE:
This warranty information applies only to verified customer complaints on vehicles eligible for warranty repair. Refer to the Warranty Wizard for warranty term information.
Additional diagnostic time cannot be claimed for this repair.
|
Replace variable swirl shutter valve actuator |
Reprogram the PCM |
Replace variable swirl shutter valve actuator and reprogram the PCM |
|
|
Warranty Type |
A |
A |
A |
|
Symptom Code |
6X |
6X |
6X |
|
Damage Code |
92 |
92 |
92 |
|
Part Number Main Cause |
L3Y2-20-170 |
5555-07-020A |
L3Y2-20-170 |
|
Quantity |
1 |
0 |
1 |
|
Operation Number / Labor Hours: |
XXC026R1 / 0.5 Hrs. |
XXC026R2 / 0.3 Hrs. |
XXC026R3 / 0.8 Hrs. |