01-028/04 MAZDA
SPECIAL PROGRAM (MSP05) - 2004 MAZDA3 - O2 SENSOR DTC ERROR, P2195 /
P2196
APPLICABLE
MODEL(S)/VINS
2004 MAZDA3, 2.0L Engine, PZEV (Partial Zero Emission Vehicle),
built from September 29, 2003 through July 2, 2004 (California Emission
Regulation Applicable Model only)
- VIN Range: JM1 BK**F* 41
100220 - 206392
DESCRIPTION
It is possible that the DTC for O2 sensor failure may not
be displayed appropriately.
The DTC P2195 (Front HO2S Signal Stuck Lean) and DTC P2196 (Front
HO2S Signal Stuck Rich) may be displayed in reverse. The DTC P2195
may be displayed in case of "stuck rich" and the
DTC P2196 may be displayed in case of "stuck lean".
NOTE:
- UNDER THE MAZDA SPECIAL PROGRAM (MSP05), ALL
CURRENT DEALER INVENTORY AND RETAILED VEHICLES FOUND TO BE WITHIN
THE ABOVE VIN RANGES, AND PRODUCED FROM SEPTEMBER 29, 2003 THROUGH
JULY 2, 2004, MUST BE INSPECTED AND REPAIRED ACCORDING TO THE
INSTRUCTIONS
CONTAINED IN THIS SERVICE BULLETIN. THIS INCLUDES CUSTOMERS WHO
HAVE BROUGHT THEIR VEHICLE IN FOR NORMAL SCHEDULED MAINTENANCE AND/OR
RECALL REPAIRS THAT MAY NOT BE RELATED TO THE CONCERNS OUTLINED
IN THIS BULLETIN.
- BEFORE PERFORMING ANY REPAIR, VALIDATE THAT THE VEHICLE
IS APPLICABLE TO THIS PROGRAM BY PERFORMING AN "eMDCS WARRANTY
VEHICLE INQUIRY" AND VERIFYING THE VEHICLE DISPLAYS CAMPAIGN "MSP05".
SEE "VEHICLE INSPECTION PROCEDURE" BELOW.
DEALER INVENTORY:
Inspect and repair all current dealer inventory according
to the procedures contained in this service bulletin.
RETAIL VEHICLES:
When a retail vehicle is brought into the dealer for any type
of repair or scheduled maintenance, inspect and repair the vehicle
according to the procedures contained in this service bulletin.
VEHICLE INSPECTION PROCEDURE
- Verify the vehicle is within the following VIN range,
AND built from September 29, 2003 through July 2, 2004:
- VIN Range: JM1 BK**F* 41
100220 - 206392
- If the vehicle is within the
above VIN range, AND built from September 29, 2003 through July
2, 2004, proceed to Step 1.
- If the vehicle is not within the above VIN range, return
the vehicle to the customer or inventory.
- Perform a Warranty Vehicle Inquiry using your eMDCS System
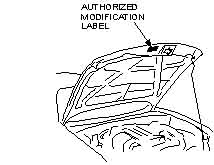
and inspect the vehicle for an Authorized Modification Label MSP05
attached to the vehicle's
hood.
NOTE: Verify the campaign
number as the
vehicle may have multiple labels.

eMDCS System - Warranty Vehicle Inquiry Results
|
If eMDCS displays:
|
Compaign Label is:
|
Action Required:
|
|
"Campaign: MSP05 Open"
|
Present
|
Contact the Mazda Corporate
Dealer Assistance Group at (877) 727-6626 to update vehicle history
|
|
Not present
|
Proceed to "REPAIR
PROCEDURE"
|
|
"Campaign: MSP05 Closed"
|
Present
|
Return vehicle to inventory
or customer
|
|
Not present
|
Complete a label and
apply it to vehicle's hood
|
|
"Campaign:
MSP05 Open" or "Closed" is not displayed
|
Does not apply
|
Campaign does not apply
to this vehicle. Return the vehicle to inventory or customer
|
REPAIR PROCEDURE
- When a subject vehicle within VIN range is brought into
the dealer for MIL illumination with DTC P2195 or P2196 stored in
memory, carry out the following operations.
- If the DTC P2195 is stored
in memory, perform the necessary diagnosis or repair according to
the "On-Board Diagnostic" of Workshop Manual for
DTC P2196 instead of P2195. Proceed to Step 2.
- If the DTC P2196 is stored in memory, perform the necessary
diagnosis or repair according to the "On-Board Diagnostic" of
Workshop Manual for DTC P2195 instead of P2196. Proceed to Step
2.
NOTE: Be sure to reprogram
the PCM after performing
the diagnostic/repair for the DTC P2195/P2196,
so as to identify the actual malfunction condition from the data
stored.
- Verify vehicle is within VIN range and has not been previously
reprogrammed to the "E" calibration level.
NOTE: Current calibration
level can be
checked using WDS. After identifying vehicle, select "Log
Viewer" icon (center icon) at the lower left section of
the screen. Scroll down on WDS screen and locate "Filename:".
The last digit of the "Filename" is the current
calibration identifier. For example: SW-LF67EE. Vehicles that are
not at the "E" calibration or later need to be
programmed using this repair procedure.
- Using WDS B32.2 or later software, reprogram the PCM to
the latest calibration (refer to "Calibration Information" table)
by following the "Module Reprogramming" procedure.
NOTE:
- Always update the WDS PTU first, then install
the needed calibration file that WDS shows during PCM reprogramming.
Go to "WDS Calibration" on ESI and download the "update" file.
If the PTU is not updated to the latest WDS calibration level, the
calibration file will not install into the PTU.
- It is not necessary to remove any fuses or relays during
PCM reprogramming when the WDS screen prompts you to do so. You
may accidentally stop power to one of the PCM terminals and cause
the PCM to be blanked, or you may receive error messages during
the WDS reprogramming procedure.
- WDS shows the calibration part numbers after programming
the PCM.
- Please be aware that PCM calibration part numbers and
file names listed in any Service Bulletin may change due to future
releases of WDS software, and additional revisions made to those
calibrations
for service related concerns.
- When reprogramming a PCM, WDS will always display the
"latest" calibration
P/N available for that vehicle. If any calibration has
been revised/updated to contain new information for a new service
concern/issue, it will also contain all previously released
calibrations.
- When performing this procedure, if the WDS PTU is not
docked and connected to 115V-120V, we recommend that a battery charger
be installed on the vehicle battery and turned ON to a maximum charge
of no more than 20 AMPS to keep the vehicle battery up to capacity.
If you exceed 20 AMPS, it will damage the WDS PTU.
- After performing the PCM reprogramming procedure, verify
the repair by starting the engine and making sure there are no MIL
illumination or abnormal warning lights present.
NOTE: After PCM
reprogramming, it is no
longer necessary to road test the vehicle to "relearn" KAM (Keep
Alive Memory).
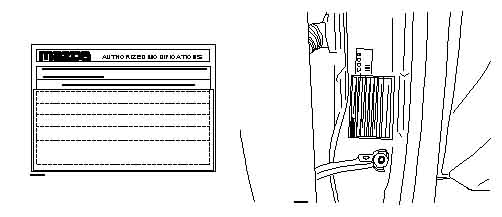
- Place an "Authorized Modification" label
(P/N 9999-95-AMDC-97) with the new calibration information
on the drivers side "A" pillar, near the door
hinges.

- Verify repair.
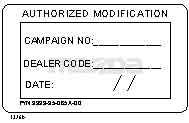
- Complete the blue "Authorized Modification" label
(9999-95-065A-00) with the Campaign number "MSP05" written
on the sticker and affix it to the vehicle's hood. Refer
to the illustration under "VEHICLE INSPECTION PROCEDURE".

- Return the vehicle to the customer.
CALIBRATION INFORMATION
|
Transmission
|
New PCM Calibration
Part Number
|
File Name
|
|
M/T
|
LF67-18-881E
|
SW-LF67EE000
|
|
A/T
|
LF69-18-881E
|
SW-LF69EE000
|
NOTE: The PCM Calibration Part
Numbers
listed above are provided for PCM reprogramming purposes only. These
are not necessarily the same Mazda part numbers used to order an
actual PCM through the Mazda Parts System. It is not necessary to
order a PCM as part of this repair procedure.
WARRANTY INFORMATION
NOTE:
- This warranty information applies only to verified
customer complaints on vehicles eligible for warranty repair. Refer
to the SRT microfiche for warranty term information.
- Additional diagnostic time cannot be claimed for this
repair.
|
Warranty Type
|
A
|
|
Symptom Code
|
99
|
|
Damage Code
|
99
|
|
Process Number
|
A4450H
|
|
Part Number Main Cause
|
LFYM-18-881 - M/T
LFYN-18-881 - A/T
|
|
Quantity
|
0
|
|
Operation Number / Labor Hours
|
XX723XRX / 0.4
Hr.
|
Copyright © Mazda North American Operations


