NOTE: This bulletin replaces 01-025/04. Please update your records accordingly.
This bulletin supersedes the previous bulletin 01-025/04, issued on 07/21/04. The APPLICABLE MODEL(S)/VINS have been revised.
2004-2005 Miata/Mazdaspeed Miata
2006-2008 MX-5
2004-2006 MPV
2004-2008 Mazda3
2007-2008 Mazdaspeed3
2006-2008 Mazda5
2004-2008 RX-8
2004-2008 Mazda6
2006-2007 Mazdaspeed6
2007-2008 CX-7
2007-2008 CX-9
2004-2006 and 2008 Tribute
2008 Tribute Hybrid
2004-2008 B-Series
Use the following repair procedures to test Mazda vehicle batteries and to generate a Diagnostic Trouble Code (DTC). A DTC is required for warranty claim submission. Incorrect battery testing using the Mazda Micro491 Required Battery Tester may result in unnecessary/improper battery replacement.
Mazda batteries have two (2) rating types:
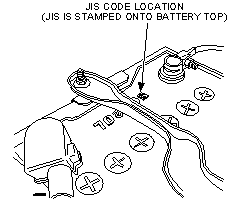
1. JIS (Japanese Industrial Standard):
JIS coding identifies a battery by the capacity (amps), dimensions, and battery terminal type. Vehicles manufactured in Japan come from the factory with a JIS rated battery. JIS codes are six-digit alpha-numeric markings molded into the top of the battery.
NOTE: If the vehicle's original JIS battery has been replaced, test the battery using the JIS rating listed on the battery.
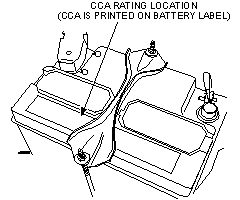
2. CCA (Cold Cranking Amps):
CCA rated batteries are supplied with domestically produced vehicles. The CCA rating indicates the battery's Cold Cranking Amps. This CCA rating is normally located on a sticker affixed to the top of the battery.
NOTE: If incorrect CCA rating is entered, it will result in a false and invalid DTC authorization code from the tester. This will also result in unnecessary/improper replacement of batteries.
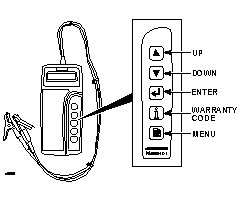
Mazda Micro491 Battery Tester Controls:
1. Using the Mazda Micro491 Battery Tester, attach the red probe to the positive battery terminal and the black probe to the negative terminal.NOTE: The tester's display screen will automatically activate for batteries above 1 volt. For batteries that are below 1 volt, it may be necessary to charge the battery for 30 minutes to raise the battery above 1 volt for testing and DTC retrieval.
2. Select the appropriate "IN-VEHICLE" or "OUT-OF-VEHICLE" test by scrolling with the UP and DOWN arrows, then press ENTER.NOTE: When performing an "In-Vehicle" battery test, make certain that the key is in the OFF position and all electrical accessories and lights are turned off. Be sure that no diagnostic equipment is attached to the vehicle or DLC.
3. Select the correct rating system for the battery by identifying the correct JIS or CCA code.
4. Enter the correct battery rating by using the UP and DOWN arrows to scroll to the correct rating, then press ENTER to start the battery test.NOTE: For JIS batteries, the tester will only display the first five digits of the six-digit JIS number. Select the JIS number which represents the first five digits of the battery JIS code.
5. The battery tester will display one of the five possible results listed below. Review the results and follow the Action Step for the displayed result.
Battery Tester Display
Action Step
"BATTERY GOOD"
Return the vehicle to customer
"GOOD - RECHARGE"
Fully charge the battery by normal recharging method. Return the vehicle to customer.
NOTE: If battery tester displays one of the three results listed below, perform a one (1) time quick recharging for 30 minutes, repeat Steps 1 - 5, retest, then follow the Action Step for the displayed result.
Battery Tester Display
Action Step
"CHARGE & RETEST"
Fully charge battery by normal recharging method one (1) time. Repeat Steps 1 - 5.
NOTE: If same result is displayed on 2nd test attempt, proceed to Step 6.
"BAD CELL"
Proceed to Step 6
"REPLACE BATTERY"
Proceed to Step 6
6. Generate a DTC by performing the following steps:NOTE: These steps are required when submitting a Mazda warranty claim for battery replacement.
Press the "i" icon.
Enter the Warranty RO number by using the UP and DOWN buttons to scroll to the correct character, then press ENTER to select each character.
Enter the RO Line Number by using the UP and DOWN buttons to scroll to the correct character, then press ENTER to select each character.
Press ENTER when complete to view the Warranty Approval Code.
Press ENTER again to view the DTC Code.
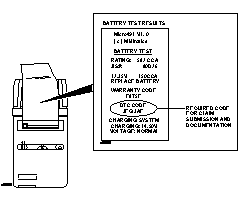
7. To print test results for attachment to RO, perform the following steps:
Turn off the battery tester by disconnecting the battery test leads from the battery.
Align the infrared ports of the battery tester and the printer.
With the tester off, press and hold the print button to activate the OPTION menu.
Use the UP and DOWN arrows to scroll to PRINT RESULTS, then press the ENTER button.
NOTE:
.
The tester will print the results from the last battery test completed.
If the tester results do not print, verify that the infrared IR port of the tester is pointing correctly at the infrared IR port of the printer.
8. Write the DTC on the RO and attach the printed results to the RO (do not attach with tape due to reaction with the printer paper).NOTE: DTC is required for warranty claim submission. Claims filed WITHOUT correct codes will be subject to warranty claim denial.
9. Perform appropriate repair to vehicle.
10. Verify repair.
|
Part Number |
Description |
Notes |
|
162-00017 |
Mazda Micro491 Battery Tester, Printer & Case |
Available On MStore |
|
162-00015 |
Mazda Micro491 Battery Tester Only |
Available On MStore |
|
162-00016 |
Mazda Micro491 Printer & Case |
Available On MStore |