NOTE: This bulletin replaces 02-002/03. Please update your records accordingly.
This bulletin supersedes the previous bulletin 02-004/04, issued 08/26/2004. The APPLICABLE MODEL(S)/VINS, TIRE PRESSURE ADJUSTMENT and AFTERMARKET WHEELS information has been revised.
2004-2005 RX8 (TPMS is standard on all models)
2004-2005 Mazda3 (TPMS is optional on some models)
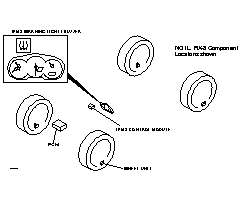
Some Mazda vehicles are now equipped with TPMS (Tire Pressure Monitoring System). This system consists of 4-wheel units, a control module, a warning light and a warning buzzer.
Aftermarket wheels or factory replacement wheels installed without wheel sensors
Tire pressures were adjusted with tires hot, light comes on when vehicle is cold. (Tire pressures must always be adjusted cold)
Low air pressure in any or all wheels below 179.26 kpa (26 PSI)
High air pressure in any or all wheels above 337.84 kpa (49 PSI)
Spare tire installed on vehicle
Instant Mobility System repair agent or fix-a-flat was used and is clogging a wheel unit
NOTE: The TPMS system will turn the warning lamp off after the vehicle is driven over 25 KM/h (16 MPH). Example: If you correct tire pressure after repairing a flat tire, or reset tire pressure to the proper range, (such as at PDI to correct high shipping tire pressures), the TPMS warning light will stay illuminated until the vehicle is driven over 25 KM/h (16 MPH).
Using a "stick" or other mechanical air pressure measuring gauges may not provide accurate results. Mazda recommends using a digital type gauge for best results. Example: Accutire model MS-4000.
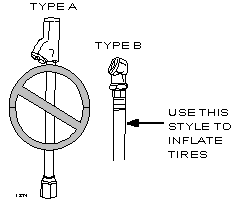
To prevent damage to the valve area of the wheel unit or pressure loss during tire pressure adjustment, use "Type B" tool with a round end as shown, not a "Type A" tool.
Perform tire pressure adjustment when tires are cold. Tire pressure will vary according to the tire temperature. When pressure is adjusted on hot tires to the cold inflation pressure, the TPMS warning lamp / buzzer may turn on after the tires cool and pressure drops below specification.
Tire pressure lowers gradually as time passes. Due to this, monthly tire pressure inspection and/or adjustment is recommended.
NOTE: Please advise customers of the tire pressure adjustment information to avoid unnecessary visits to the dealership.
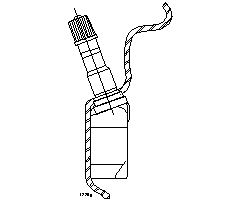
CAUTION: The wheel unit air pressure stem is made from aluminum and can be damaged. Do not tilt or use excessive side force when checking air pressure or filling tire with air. Some tire pressure gauges and air filling nozzles have extended tips, which can provide enough leverage to easily bend or break the wheel unit.
1. Remove the wheel from the vehicle.
2. Remove the valve stem cap.
3. Remove schrader valve.
4. Un-bolt the TPMS wheel unit (11mm deep socket). Allow the sensor to fall into the wheel.NOTE: This will prevent damage to the sensor while the tire is removed from the wheel with a tire removal machine.
5. Remove the tire from the wheel. Recover the TPMS wheel unit and store it in a safe place.NOTE: RX8 - If IMS (Instant Mobility System) repair fluid was used, be sure to recover the fluid and dispose of it following local waste disposal regulations. Be sure to replace the IMS fluid in the vehicle to prepare for future tire emergencies.
CAUTION: RX8 - If IMS repair fluid was used, be sure to dispose of the old tire and replace it with a new one. The IMS fluid is not compatible with tire patches or plugs, after using IMS fluid, the tire must be disposed of and replaced.
6. Place the TPMS wheel unit into the wheel, make sure the seal is fully seated as in the figure below.
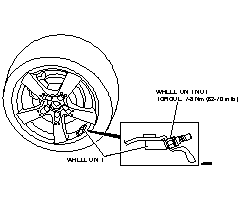
7. Install the TPMS wheel unit nut by hand and turn at least 2- full revolutions by hand.
Torque the wheel unit nut slowly (approximately 1-turn in 10-seconds) to 7 to 8 N.m (62 to 70 in.lb.).
CAUTION: The wheel unit air pressure stem is made from aluminum and can be damaged. Do not tilt or use excessive side force when installing the wheel unit nut. Most torque wrenches or ratchets provide enough leverage to easily bend or break the wheel unit when excessive side force is applied.
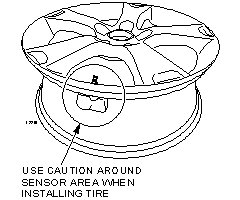
8. Install the tire to the wheel:CAUTION: Use care when installing the tire to the wheel with the bar. Place the bar on the rim in a location that will not contact the sensor.
9. Seat the tire bead.
10. Install the schrader valve.
11. Inflate the tire to specifications (see label on driver door).CAUTION: The wheel unit air pressure stem is made from aluminum and can be damaged. Do not tilt or use excessive side force when checking air pressure or filling tire with air. Some tire pressure gauges and air filling nozzles have extended tips, which can provide enough leverage to easily bend or break the wheel unit.
12. Install the valve stem cap.
13. Install the wheel to the vehicle.
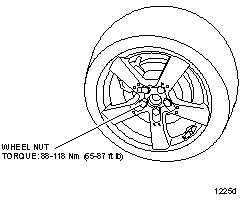
14. Torque all wheel nuts to 88 to 118 N.m (65 to 87 ft. lb.) in a criss-cross pattern.
15. Verify that the TPMS system operates properly.
Drive vehicle over 25 KM/h (16 MPH) to verify TPMS warning buzzer and light remain off.
After swapping a wheel or wheels from one vehicle to another, it is necessary to register the ID codes of the new wheel unit(s) to each vehicles TPMS control module.
1. Swap wheel or wheels from one TPMS equipped vehicle to the other.
2. Torque all wheel nuts to 88 to 118 N.m (65 to 87 ft. lb.) in a criss-cross pattern.
3. Perform Wheel Unit Auto Registration:
Turn ignition on.
Turn ignition off.
Leave vehicle with engine off for more than 15 minutes.
Drive each vehicle over 25 KM/h (16 MPH) for more than 10 minutes to register the new ID codes.
The wheels equipped on your Mazda are specifically designed for installation of the TPMS wheel units. DO NOT install non-genuine Mazda aftermarket wheels, otherwise it may not be possible to install the TPMS wheel units.
This procedure should be used whenever it is necessary to replace a TPMS sensor.
1. Follow the instructions above for CHANGING TIRES ON WHEELS EQUIPPED WITH TPMS WHEEL UNITS.
2. Verify tire pressure is correct. (See label on driver door).
3. Perform Wheel Unit Auto Registration:
Turn ignition on.
Turn ignition off.
Leave vehicle with engine off for more than 15 minutes.
Drive vehicle over 25 KM/h (16 MPH) for more than 10 minutes to register the new ID codes.
The TPMS system does not include a sensor for the spare tire on the Mazda3 or the accessory trunk mounted spare tire kit available for RX8. This means that the spare tire will not be monitored for tire pressure. The spare tire should be checked at regular services to verify proper pressure and tire condition.
When the spare tire is installed to a wheel of the vehicle, the TPMS system will illuminate the TPMS warning light and the warning buzzer may sound.
When a temporary spare tire is in use, the customer must follow special instructions found in the owner's manual and on the tire sidewall involving speed and distance limitations.