This bulletin supersedes 09-001/04, issued 02/03/04. The REPAIR PROCEDURE has been revised.
2000 and later 626, Miata, Millenia, MPV, Protege, Protege5
2002 and later Tribute
2000 and later Truck
2003 and later Mazda6
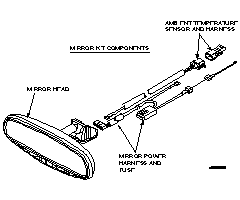
NOTE: The following information only applies to vehicles equipped with port or dealer installed auto-dimming accessory mirror w/electronic compass and ambient temperature. If vehicle is equipped with factory installed auto-dimming mirror w/electronic compass and ambient temperature, refer to the appropriate factory workshop manual for information.
NOTE: Mazda6 may come with
factory
or accessory installed auto-dimming mirror. If the unit is factory
installed, look in the wiring diagram for wiring information, if the
unit is port or dealer installed, then the wiring information in this
bulletin applies.
|
Model |
Connector |
Pin |
Spliced Wire Color |
2000-2003 Wiring Diagram Connector Location / Pin Location Page |
|
Miata |
X-07 |
Yellow |
Z-87 / Z-88 |
|
|
Millenia |
JB-10 |
F |
Not Applicable |
Z-149 |
|
MPV |
JB-01 |
D |
Not Applicable |
Z-147 |
|
Protege |
JB-03 |
I |
Not Applicable |
Z-123 |
|
Tribute |
X-270a |
3 |
Not Applicable |
Z-155 |
|
Truck |
X-135* |
29 |
V/O Violet/Orange |
Z-145 / Z-160 |
|
626 |
JB-04 |
F |
Not Applicable |
Z-117 |
|
Mazda6 |
JB-05 |
A |
Red/White |
156 |
|
Model |
Connector |
Pin |
Spliced Wire Color |
2000-2003 Wiring Diagram Connector Location / Pin Location Page |
|
Mazda6 |
JB-05 |
E |
Blue /Red |
194-195 |
|
Model |
Description |
Figure |
|
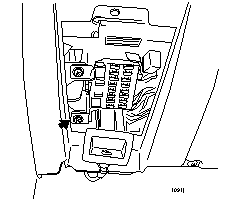
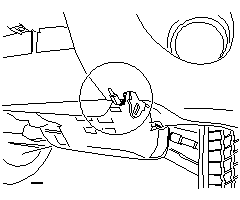
Miata |
Lower left mounting screw of in vehicle fuse box (JB Joint Box) |
|
|
Millenia |
Bottom mounting nut of In vehicle fuse box (JB Joint Box) |
|
|
MPV |
Nut behind dash above OBDII 16 pin connector |
|
|
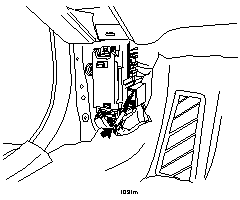
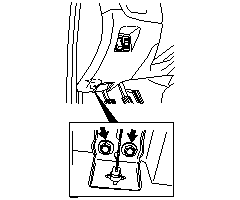
Protege |
Bolt behind left kick panel |
|
|
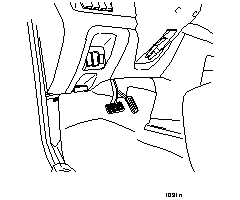
Tribute |
Left bolt of hood release handle |
|
|
Truck 626 |
Bolt behind left kick panel |
|
|
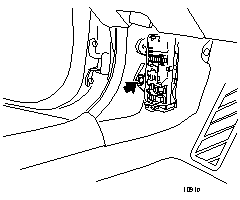
Mazda6 |
Ground 2 JC-02 above n vehicle fuse box. Page 16 in Wiring Diagram |
|
Model |
Description |
Figure |
|
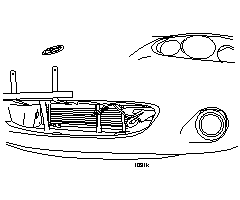
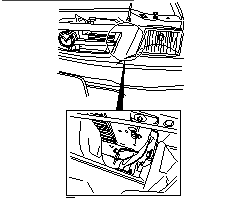
Miata |
Center front of vehicle, behind grill, on radiator core support, near top |
|
|
Millenia Mazda6 |
Not Applicable, Millenia and Mazda6 are factory equipped with an ambient temperature sensor for the AC system |
|
|
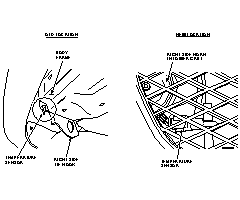
MPV |
Old location: behind passenger side of grill next to horn. New location for more accurate temperatures: attached to lower engine plastic shield behind horn. |
|
|
Protege |
Front driver side, under bumper, above tow hook |
|
|
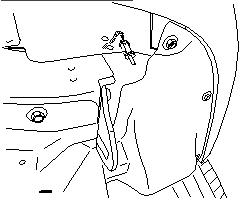
Tribute |
Driver side, under front bumper, 2 inches in-board of tow hook |
|
|
Truck |
Mounted to hole near bottom driver side of radiator (between grill and radiator) |
|
|
626 |
Center front of vehicle, behind grill, on radiator core support |
|
|
CONDITION |
POSSIBLE CAUSE |
ACTION |
|
Mirror face does not dim or Mirror Inoperative or Loss of Power |
|
|
|
Mirror face is always dim |
|
|
|
Compass display is inaccurate
|
|
|
|
No compass display |
|
|
|
OC is shown in temperature display |
|
|
|
SC is shown in temperature display |
|
|
|
Temperature reading is inaccurate
|
|
|
|
Segments of display LEDs do not work |
|
|
|
Display is always dim |
|
|
|
Homelink Inoperative |
|
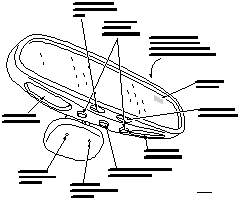
The forward facing sensor detects ambient light. This is to determine day or night time. This sensor will dim the mirror during night driving.
NOTE: The forward sensor dims in proportion to how dark it is. If the forward sensor is covered entirely, the mirror defaults to its darkest setting.
The rear facing sensor detects light coming from vehicle headlights from behind. The rear facing sensor is used to darken the mirror further when headlights are detected.
|
TEST STEP |
RESULT |
ACTION |
|
A1: Turn the ignition ON. Is green LED on? |
YES NO |
Go to A3 Go to A2 |
|
A2: Turn auto dimming On: Is green LED on? |
YES NO |
Go to A3 Go to A4 |
|
A3: Cover forward facing light sensor in back of mirror. Does mirror face dim? |
YES NO |
Test finished, mirror functional Replace mirror head |
|
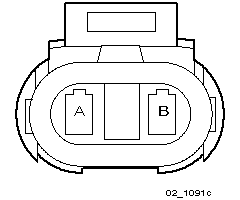
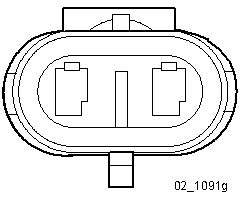
A4: Remove 7-pin connector from back of mirror. Turn ignition to ON. Use a DVOM to measure voltage between pins 1 and 2 .
|
YES NO |
Replace mirror head. Go to A5 |
|
A5: Inspect 1-amp fuse. Is fuse blown? |
YES NO |
Repair short to ground in ignition feed, then go to A1 Go to A6 |
|
A6: Verify correct harness connections to vehicle ignition power supply and ground. Pin 1 of mirror head 7-pin connector, connects through a 1amp fuse to ignition ON from sub-connector in vehicle fuse panel. Pin2 of mirror head 7-pin connector, connects to body ground at an eylet in the left kick panel area. Was a problem found? |
YES NO |
Repair wiring harness concern, then go to A1 Go to A1 |
|
TEST STEP |
RESULT |
ACTION |
|
B1: Is anything blocking the the photo-sensor opening on the front of the mirror? |
YES NO |
Remove the obstruction and verify that the mirror no longer dims Replace the mirror head |
|
TEST STEP |
RESULT |
ACTION |
|
C1: Is compass display switched on? Turn ignition on. Press compass on button. Does Compass turn on? |
YES NO |
Go to C2 Go to A1 |
|
C2: Is compass pod snapped onto mirror mount? |
YES NO |
Go to C3 Snap mirror pod into position, go to C3 |
|
C3: See below. Is correct Zone selected? |
YES NO |
Go to C4 Reset Zone, go to C4 |
|
C4: See : below. Will compass calibrate? |
YES NO |
Calibrate compass, go to C5 Replace mirror head. |
|
C5: Compare electronic compass to mechanical compass. Are electronic and mechanical compass readings similar? |
YES NO |
Return vehicle to customer Go to C6 |
|
C6: Verify no large metallic objects, buildings, electrical power lines, or magnets are near the electronic compass or vehicle. Are any interferences nearby? |
YES NO |
Remove interference and go to C5 Replace mirror head |
Compass Zone Selection:
NOTE: There are 2- different types of mirror setting controls the first type is done by pressing and holding an external switch, the other type is done using a paperclip to press an internal switch.
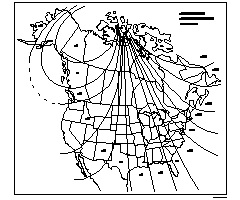
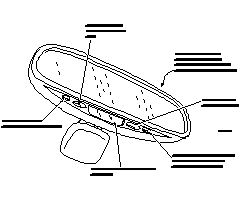
Press the switch on the right side of the mirror until ZONE is displayed.
Now press and release the switch on the right side of the mirror until the correct zone for your region is displayed (1 through 15). Use the map below to select the correct zone.
NOTE: This setting must be adjusted every time a customer passes through 3 zones.
Compass Calibration
Find a large open area with no overhead power lines or large metallic structures or objects.
NOTE: The area must be large enough to drive the vehicle in a circle several times.
Press and hold the switch on the left side of the mirror until CAL appears.
Drive the vehicle slowly in a circle until the word CAL disappears from the display, approximately two to four complete circles in the same direction.
NOTE: This calibration is necessary when the mirror with compass is initially installed in a vehicle and when a vehicle travels through 3 or more zones.
CAUTION: Magnets and large metal structures can interfere with the operation and accuracy of the compass.
|
TEST STEP |
RESULT |
ACTION |
|
D1: Is compass display switched on? Turn ignition on. Press compass on button. Does Compass turn on? |
YES NO |
Return vehicle to customer Go to A4 |
If the temperature display shows OC, the sensor is either internally an open circuit or there is an open in one of the sensor wires.
|
TEST STEP |
RESULT |
ACTION |
|
E1: Ignition On. Temperature switched on. Unplug temperature sensor. Use DVOM, inspect voltage between sensor wires A (Black/Green) and B (Black).
|
YES NO |
Go to E3 Go to E2 |
|
E2: Was 12-volts present in step E1? |
YES NO |
Repair the short to B in the temperature sensor harness (Black/Green) Go to A1 |
|
E3: Measure the resistance of the temperature sensor and compare it to the chart below. Is the temperature sensor resistance correct for ambient temperature? |
YES NO |
Go to E6 Replace temperature sensor |
|
E4: Disconnect the 7-pin connector from the mirrror. Use a DVOM, inspect continuity between Pin A (Black/Green) at the temperature sensor and Pin 6 or 7 (Black/Green)-(varies depending on initial assembly, wires are not polarity specific).
|
YES NO |
Repair the open circuit Go to E5 |
|
E5: Use a DVOM, inspect continuity between Pin B (Black) at the temperature sensor and Pin 6 or 7 (Black)-(varies depending on initial assembly, wires are not polarity specific, verify wire color)
|
YES NO |
Repair the open circuit Go to E6 |
|
E6: Inspect for damaged pin terminals at the sensor and the mirror assembly. Was a problem found? |
YES NO |
Repair the terminals. Replace the mirror head |
|
Degrees Celsius, ( Farenheit) |
Resistance (Ohms) (/- 150) |
Volts (/- 0.15) |
|
0 C (32F) |
27,000 - 30,000 |
3.0 |
|
4 C (40 F) |
25,000 |
2.8 |
|
7 C (45 F) |
22,000 |
2.6 |
|
10 C (50 F) |
18,500 |
2.5 |
|
12 C (55 F) |
16,500 |
2.3 |
|
15 C (60 F) |
14,500 |
2.2 |
|
18 C (65 F) |
13,000 |
2.0 |
|
21 C (70 F) |
1100 |
1.8 |
|
23 C (75 F) |
9800 |
1.6 |
|
26 C (80 F) |
8700 |
1.5 |
|
29 C (85 F) |
8000 |
1.4 |
|
32 C (90 F) |
7300 |
1.3 |
|
35 C (95 F) |
6300 |
1.2 |
|
37 C (100 F)) |
5500 |
1.1 |
|
40 C (105 F) |
4900 |
1.0 |
|
43 C (110 F) |
4200 |
0.9 |
|
46 C (115 F) |
3900 |
0.85 |
|
49 C (120 F) |
3500 |
0.77 |
|
51 C (125 F) |
3100 |
0.7 |
|
54 C (130 F) |
2800 |
0.65 |
|
57 C (135 F) |
2500 |
0.6 |
|
60 C (140 F) |
2000 |
0.5 |
If the temperature display shows SC, the sensor is either shorted internally, the sensor signal (5) wire is shorted to B, or the sensor wires are shorted together.
|
TEST STEP |
RESULT |
ACTION |
|
F1: Ignition On. Temperature reading switched on. Unplug temperature sensor. (NOTE: Due to the temperature display smoothing feature, you may have to wait at least 30-seconds for the temperature display to change after the sensor is disconnected). Did the display change from SC to OC? |
YES NO |
Replace the temperature sensor. Go to F2 |
|
F2: Ignition off. Disconnect the 7-pin connector from the mirror head. Measure continuity between pin A (Black/Green) and pin B (Black) of the temperature sensor connector.
|
YES NO |
Repair the short in the temperature sensor harness. Go to F3 |
|
F3: Disconnect the negative battery cable. Measure continuity between pin A (Black/Green) of the temperature sensor connector and ground. Is there continuity? |
YES NO |
Repair the short to ground in the temperature sensor harness. Go to F4 |
|
F5: Inspect for damaged pin terminals at the sensor and the mirror assembly. Was a problem found? |
YES NO |
Repair the terminals. Replace the mirror head |
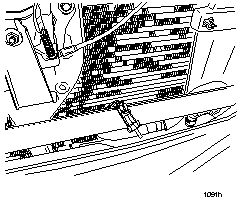
The temperature sensor is mounted in front of the bumper area. Due to its location, the sensor can be affected by road or engine heat during idling or slow driving. Adaptation to ambient temperature takes place in steps through time filtering and depends on the prevailing driving conditions and amount of temperature change. Because of the filtering, the display will take up to 3 minutes to update to ambient temperature if the current ambient temperature is higher than the previous time the vehicle was turned on.
NOTE: Place the temperature sensor in a cup of Ice water or heated water to check its range of operation and compare it to an analog thermometer.
CAUTION: The outside temperature indicator is not designed to serve as an ice warning device and is not suitable for that purpose. Indicated temperatures just above freezing do not guarantee that the road surface is free of ice.
|
TEST STEP |
RESULT |
ACTION |
|
G1: Is temperature reading of ambient temperature accurate while driving? |
YES NO |
Return vehicle to customer and explain operating characteristics from page 2-3 of this bulletin. Go to G2 |
|
G2: Is temperature sensor correctly mounted see the chart? |
YES NO |
Go to G3. Mount sensor in correct location |
|
G3: Remove the temperature sensor. Compare resistance value of temperature sensor with ambient temperature using the chart below and a thermometer. NOTE: Verify customer expectations about sensor operation are within the operating parameters explained above. Is the sensor reading accurate. |
YES NO |
Replace mirror head Replace temperature sensor |
|
Degrees Celsius, ( Farenheit) |
Resistance (Ohms) (/- 150) |
Volts (/- 0.15) |
|
0 C (32F) |
27,000 - 30,000 |
3.0 |
|
4 C (40 F) |
25,000 |
2.8 |
|
7 C (45 F) |
22,000 |
2.6 |
|
10 C (50 F) |
18,500 |
2.5 |
|
12 C (55 F) |
16,500 |
2.3 |
|
15 C (60 F) |
14,500 |
2.2 |
|
18 C (65 F) |
13,000 |
2.0 |
|
21 C (70 F) |
1100 |
1.8 |
|
23 C (75 F) |
9800 |
1.6 |
|
26 C (80 F) |
8700 |
1.5 |
|
29 C (85 F) |
8000 |
1.4 |
|
32 C (90 F) |
7300 |
1.3 |
|
35 C (95 F) |
6300 |
1.2 |
|
37 C (100 F)) |
5500 |
1.1 |
|
40 C (105 F) |
4900 |
1.0 |
|
43 C (110 F) |
4200 |
0.9 |
|
46 C (115 F) |
3900 |
0.85 |
|
49 C (120 F) |
3500 |
0.77 |
|
51 C (125 F) |
3100 |
0.7 |
|
54 C (130 F) |
2800 |
0.65 |
|
57 C (135 F) |
2500 |
0.6 |
|
60 C (140 F) |
2000 |
0.5 |
|
TEST STEP |
RESULT |
ACTION |
|
H1: Turn ignition to on position and watch display. Do all display segments light up? |
YES NO |
Return vehicle to customer Replace mirror head |
|
TEST STEP |
RESULT |
ACTION |
|
I1: Ignition on. Is green LED on? |
YES NO |
Go to I3 Go to I2 |
|
I2: Push left mirror button. Is green LED on? |
YES NO |
Go to I3 Go to A4 |
|
I3: Cover the front photosensor opening with your finger. Does the mirror dim after 10 seconds? |
YES NO |
Return vehicle to customer Replace mirror head. |
|
TEST STEP |
RESULT |
ACTION |
|
J1: Inspect B to pin 3.
|
YES NO |
Replace mirror head. Inspect for open fuse, repair or replace as necessary? |
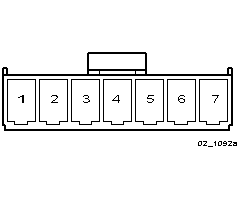
7-Pin Connector to Mirror Head
|
Pin Harness Side |
Color |
Description |
Notes |
|
1 |
Black/ White or Black/Blue |
Ignition on B |
|
|
2 |
Black |
Ground |
Eyelet connects to ground in left kick panel |
|
3 |
Black |
B |
Homelink only |
|
4 |
Not used |
||
|
5 |
Not used |
||
|
6 |
Black/Green or Black |
Temperature Sensor |
Pin 6 and 7 are not polarity specific and can be swapped |
|
7 |
Black/Green or Black |
Temperature Sensor |
Pin 6 and 7 are not polarity specific and can be swapped |
|
Part Number |
Description |
Qty. |
Notes |
|
0000-8C-A07C |
Auto-Dimming Mirror Assembly With Compass and Temperature (Kit) |
1 |
2000-2004 Miata, MPV, Protege, and 626: |
|
0000-8C-A06A |
Auto-Dimming Mirror Assembly With Compass (Kit) |
1 |
2000-2004 Miata, Millenia, MPV, Protege, 626 and Mazda6 |
|
0000-8C-B06A |
Auto-Dimming Mirror With Compass and Temperature (Kit) |
1 |
2000-2004 Truck 2002-2004 Tribute |
|
0000-8C-B07C |
Auto-Dimming Mirror With Compass (Kit) |
1 |
2000-2004 Truck 2002-2004 Tribute |
|
0000-8C-B13A |
Mirror with Compass |
1 |
Truck, Tribute (Replacement Part) |
|
0000-8C-B14A |
Mirror with Compass and Temperature |
1 |
Truck, Tribute (Replacement Part) |
|
0000-8C-A13A |
Mirror with Compass |
1 |
Miata, Millenia, MPV, Protege, and 626 (Replacement Part) |
|
0000-8C-A14A |
Mirror with Compass and Temperature |
1 |
Miata, Millenia, MPV, Protege, and 626 (Replacement Part) |
|
0000-8C-B10 |
Harness Assembly (Temperature Sensor) |
1 |
all models (Replacement Part) |
|
0000-8C-B11 |
Harness Assembly (Power) |
1 |
all models (Replacement Part) |
|
0000-8C-B12 |
Temperature Sensor |
1 |
all models (Replacement Part) |