TSB: 09-042/04
1995-2005 MULTIPLE MODELS - REAR
WINDOW DEFROSTER GRID LINE DIAGNOSIS / REPAIR AND TERMINAL TAB REPAIR
NOTE: This bulletin replaces
09-004/03. Please update your records accordingly.
BULLETIN NOTE
-
This bulletin supersedes 09-004/03, issued 2/7/03. The
APPLICABLE MODEL(S)/VINS, REPAIR PROCEDURE, PART(S) INFORMATION,
WARRANTY INFORMATION have been revised.
APPLICABLE MODEL(S)/VINS
DESCRIPTION
Some vehicles
may exhibit inoperative electric rear window defroster grid lines,
integral antenna concerns causing radio reception issues or terminal
tabs pulled from the rear window glass.
Follow the diagnostic
and repair procedures included in this bulletin to inspect and service
rear defroster grid lines, integral antenna concerns or broken terminal
tabs.
REPAIR PROCEDURE
Warrantable/Non-Warrantable Repairs
Warrantable
grid line repairs typically can be identified by one inoperative grid
line with a small discoloration at the area of concern, approximately
the size of a pinhead. Grid line(s) that are scratched or have the
silver material (which usually tarnishes brown over time) removed are
not warrantable and should be addressed with the customer.
NOTE: The grid line material is
not
embedded into the glass but is baked to the glass surface and
consequently can be scraped off. Inoperative lines may appear to the
eye to be undamaged due to residue remaining on the glass and will
require diagnosis with a voltmeter or 12V test lamp as explained in
this article.
Examples of Non-Warrantable Grid Line Damage
-
Ice scraper damage to grid lines
-
Animal scratches on grid lines
-
Window tint film/removal of the film which damages grid lines
-
Stickers placed over grids which upon removal, removes the
grid line material
-
License plate (steel type placed against the inside of back
glass) which rubs on the grid line causing damage
-
Temporary license plate (paper stuck on to the inside of the
back glass) which upon removal removes grid line material
-
Cargo or lumber rubbing against the glass which removes grid
line material
-
Cellular phone antenna installation/removal which damages grid
line material
NOTE: An undamaged grid line
will
have small ridges that project above the surface of the glass and can
easily be felt when running a fingertips across them. Grid lines that
have been razor bladed will feel smooth when a fingernail is dragged
across the affected area. There may be some residue left on the glass
that appears to be grid material but a check with a voltmeter or 12V
test lamp, as explained in this article, will confirm an open circuit.
GRID LINE REPAIR PROCEDURE
NOTE:
-
Long gaps are almost always due to damage and are not
warrantable, however they can be repaired. The longer the gap the more
important it is to apply a minimum six (6) coats of conductive repair
material with the five (5) minute dry time between each coat. Applying
less coats or not allowing dry time between coats will produce repaired
resistance that is greater than ohm resistance, resulting in poor
defrost performance and excessive localized heating.
-
Repaired long gaps are generally not visually pleasing unless
extreme care is taken when taping affected grid line areas.
-
If the brown color under the grid line is damaged or missing
(this is very rare), it will be necessary to apply brown acrylic
lacquer touch-up paint for color match. This paint must meet
specification ESR-M2P100-C and should be applied to the glass prior to
applying the rear window defroster repair compound.
Service inoperative grid lines on rear window glass using Rear
Window Defroster Repair 0000-88-5067 or equivalent as follows:
Surface Preparation
1. Bring vehicle inside and warm it to 60 F (16 C) or above.
2. Clean the entire grid line service area with glass
cleaner to remove all dirt, wax, grease, oil or other foreign matter.
It is important that the repair area be clean and dry.
3. Lightly buff damaged area with FINE steel wool.
NOTE: Do not use scrapers,
sharp
instruments, or abrasive window cleaners on the interior surface of the
rear window glass as this may cause damage to the grid lines.
Mixing
-
The bottle of Rear Window Defroster Repair compound and
touch-up paint (if needed) must be at room temperature.
-
Shake the bottle for at least one (1) minute for thorough
mixing.
-
Shake frequently during use.
Application
4. Mark
location of open grid on the outside of the back window glass
(performed in diagnostics). Place protective covering over the package
tray as necessary.
5. Using fine line tape, mask off the area directly above
and below open grid line. It is best to extend the tape 26 mm (1)
beyond the concern area in both directions.
NOTE:
-
The open grid line should be at the center of the mask and
tape gap must be no wider than the existing grid line.
-
Other types of tape may be used but end results of the
repair
may not appear as visually acceptable due to ease of application and
tape edge finish.
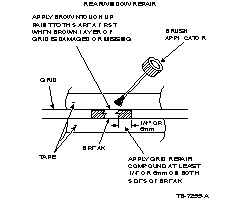
6. Inspect the area to determine if the brown layer of the
grid is missing.
NOTE: The interior side of
the grid
lines are not painted, but due to the silver tarnishing will tend to
change the grid to a gold or brown color. The repaired area will be
bright silver and will also tarnish over time to match the rest of the
grid.
7. After five (5) minutes of dry time of the final coat of
grid repair compound, remove the tape, step outside and inspect the
repaired area.
-
If the repair compound is not visible above or below the
grid, proceed to Step 5.
-
If the repair compound is visible above or below the grid,
the excess can be removed.
-
Place a single-edge razor blade on the back window glass
parallel to grid and scrape gently toward grid.
-
A wider/thicker line will perform better but may not be
cosmetically appealing.
CAUTION: Be careful not to
damage grid line with razor blade.
8. Verify all of the grid lines function properly when
finished.
Curing
The
service coating will air-dry in approximately one (1) minute and the
system can be energized after five minutes. Maximum hardness and
adhesion occur after approximately 24 hours.
SOLDERING TERMINAL LEADS (The
following procedure does not apply to MIATA MAZDA3)
The
new terminal will cover the original terminal location, but must be
placed so that the new terminal conductive areas will be on a good
conductive base. This area should be cleaned with steel wool or an
abrasive pad to remove grime from the buss-bar. After this, clean with
glass cleaner to remove all dirt, wax, grease, oil or other foreign
matter. It is important that the repair area be clean and dry and have
a metallic appearance. Depending on the buss-bar condition, polishing
with steel wool may be required. Please note that the entire buss-bar
may be cleaned to improve appearance.
CAUTION:
-
DO NOT use any type of flame torch or flame heated soldering
gun
for this procedure. Testing indicated inadequate heat generation at the
tip and the exhaust heat can cause damage to plastic trim parts in the
area.
-
Use only an electric soldering gun with 100 watts or more of
power. Before using the soldering gun, be sure to melt a small amount
of resin core solder to the tip. The solder will assist in achieving
better heat transfer from the soldering gun tip to the new terminal.
NOTE: The new terminal has
pre-applied solder, flux and temperature sensitive paint. The paint
provides a visual indication when the terminal has reached the proper
temperature to melt the solder on the terminal. When the proper
temperature is achieved the temperature paint will liquefy and change
color. Use terminal shown below.
1. Bring vehicle inside and warm it to 60 F (16 C) or
above.
NOTE: The rear window must be
at a
minimum of 60 F(16 C) before a repair is made. Place protective
covering over the rear cargo area and rear bumper as necessary.
2. Place the replacement terminal over the original tab
location making sure the conductive areas of the terminal makes good
contact with a conductive material.
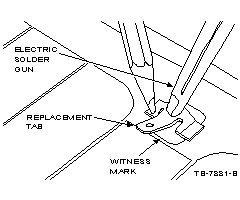
NOTE: The replacement tab
location
should cover the original tab location but still allow the replacement
tab to make good contact with a conductive material.
3. Hold the terminal in place with an item such as regular
lead pencil at a 90 degree angle from the terminal. (Holding at other
than a 90-degree angle may allow the terminal to slip when the solder
liquefies).
4. Place the soldering gun tip on the top of the terminal
but not on the painted areas of the tab. Energize the soldering gun and
watch for the painted area of the terminal to liquefy and change color.
NOTE:
-
The paint should liquefy in approximately 25-45 seconds
after heating.
-
As soon as the paint color completely changes on either side
of
the terminal, de-energize the soldering gun and continue to hold the
terminal in place with the soldering gun and pencil for an additional
thirty (30) seconds.
5. Remove the soldering gun and pencil from the terminal.
The terminal should be allowed to cool for another two (2) minutes
before the wiring lead is attached to the terminal.
6. Attach the electrical connector to this terminal, turn
on the rear defroster, and verify operation.
PART(S) INFORMATION
|
Part Number
|
Description
|
Qty.
|
Note
|
|
0000-88-5067
|
Resin
|
1
|
All
|
|
FB01-63-959
|
Terminal, Back Window Glass
|
1
|
RX-8, Protege/Protege5, MPV
|
|
GG2F-63-959
|
Terminal, Back Window Glass
|
1
|
626, MAZDA6
|
|
J001-63-959
|
Terminal, Back Window Glass
|
1
|
Millenia
|
|
EFY1-63-959
|
Terminal, Back Window Glass
|
1
|
Tribute
|
The Back Window Glass Terminals are not available for Miata and
MAZDA3.
WARRANTY INFORMATION
NOTE:
-
This warranty information applies only to verified customer
complaints on vehicles eligible for warranty repair. Refer to the SRT
microfiche for warranty term information.
-
Additional diagnostic time cannot be claimed for this repair.
|
Warranty Type
|
A
|
|
Symptom Code
|
64
|
|
Damage Code
|
9W
|
|
Part Number Main Cause
|
Refer to parts information
|
|
Quantity
|
1
|
|
Operation Number / Labor Hours:
|
XX810XR1 / 0.7 Repair grid lines (including time to diagnose
and recheck)
XX810XR2 / 0.4 Replace terminal (including time to diagnose
and recheck)
XX810XR3 / 0.8 Replace grid lines and terminal (including time
to diagnose and recheck)
|
Copyright © Mazda North American Operations