B006/95 ENGINE IDLE VIBRATION
IN D RANGE
Note: This bulletin contains revised sections. Please update
your records accordingly.
APPLICABLE MODELS/VINS
1990-94 323/Protege vehicles with an automatic transaxle and
B6-SOHC,BP-SOHC and BP-DOHC engines.
1992-94 MX-3 vehicles with an automatic transaxle and B6-DOHC
engine.
NOTE:
Refer to the Parts Information section of this bulletin for
additional VIN information.
DESCRIPTION
Excessive vibration may be felt through the steering wheel and in
the seat while idling in "D" range. Vibration is most noticeable when
electrical loads are applied. If a customer complains of excessive
vibration, follow the procedures in this bulletin to correct the
problem.
NOTE:
Customers may also describe this complaint as a rough idle.
REPAIR PROCEDURE
- Inspect the vehicle for excessive vibration. If vibration is
excessive, proceed to step 2. If vibration is caused by a rough idle,
refer to the workshop manual for troubleshooting and repair procedures.
- Check the idle speed. If the speed is not within 750 +/- 50 rpm,
connect the system selector (49B0 19 9A0) and set the selector "TEST
SW" to self-test. Adjust the idle speed to specification.
- Verify that the cooling fan coupler is not pinched between the
radiator, air cleaner and duct.
- Check for interference between the condenser and the A/C pipe.
Refer to Figure 1. Adjust as necessary.
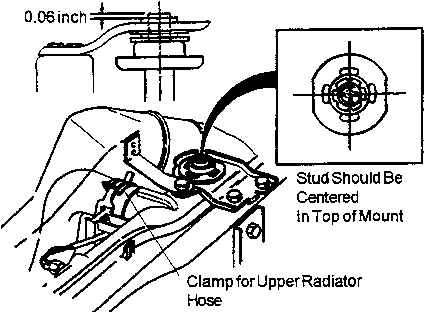
Fig. 1

- Check radiator upper mounting bracket rubber stud. The stud
should be centered in the bracket dampener and the stud should extend
no more than 0.06 in. (1.5mm) from the top of the mount as shown in Figure 2.
If stud is not centered or is above the top of the mount, adjust
as follows, if not, proceed to step 6:
- Loosen upper radiator brackets and adjust position of bracket
to stud.
- Loosen clamp on upper radiator hose and adjust radiator
position. Refer to Figure 2
Fig.2
- If the vehicle is within the following VIN range, replace the
lower radiator mount.
VIN = JM1BG****L0100001 through JM1BG****L0186253
- Replace the following engine mounts.
NOTE:
Follow all procedures when installing engine mounts. Follow these
instructions carefully to ensure accurate engine/mount alignment.
No. 4
Engine Mount
- Remove battery and battery tray.
NOTE:
Record all preset audio stations. Removal of the lower left splash
shield and A/C hose mounting bracket will facilitate removal and
replacement procedures.
- Install engine support (49 G017 5A0).
- Remove and discard No. 4 engine mount and replace with new part.
- Tighten nuts and bolts to the proper torque.
Fig. 3
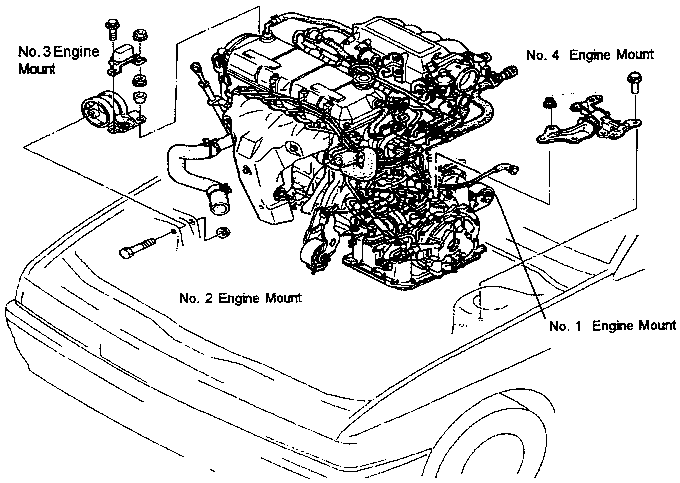
No. 1
& 2 Engine Mounts
- Loosen bolts "B" from the engine mounts.
- Remove bolts "C" from engine mounts.
- Remove No. 2 engine mount and replace with a new part.
NOTE:
Install in reverse order of removal. Snug up bolts, do not torque.
- Loosen bolts "D" and "E" on No. 1 engine mount.
- Remove bolt "D".
NOTE:
Adjust engine support to allow clearance for bolt "D" removal.
- Move engine forward. No. 1 engine mount will rotate on bolt "E".
- Remove bolt "E" and remove No. 1 engine mount. Replace with new
part.
NOTE:
Install in reverse order of removal. Snug up bolt, do not torque.
- Install battery and battery tray.
- Start engine and idle for brief period of time (approximately 1
min.).
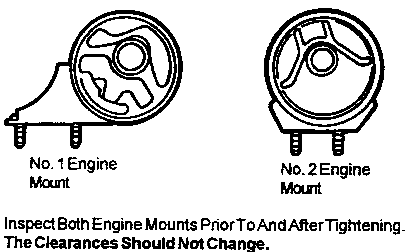
- Stop engine and tighten bolts "B" on the No.2 engine mount.
- Check clearance at No. 1 engine mount.
- Tighten bolts "B" on the No. 1 engine mount.
- Re-check clearance. Clearance should not change.
- Start engine, turn on electrical loads and A/C. Set parking brake
firmly and shift vehicle into "D" range.
- Re-check clearance. Clearance should not change.
- Verify repair, reset audio station and clock.
Fig. 4
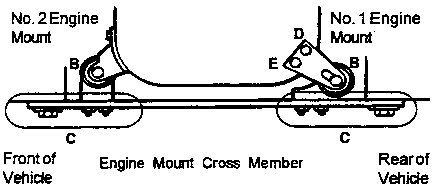
Fig. 5
PARTS
INFORMATION
|
Part Number
|
Description
|
Applicable VIN Range
|
|
B456 39 040C
|
No. 1 Engine Mount Rubber
|
JM1BG****L0100001 - R0999999
|
|
B1Y239 010
|
No. 1 Engine Mount Bracket
|
All Applicable Models
|
|
9YA09 1205
|
Bolt (for No. 1 Engine Mount)
|
All Applicable Models
|
|
9YB04 1207A
|
Flange Nut (for No. 1 Engine Mount)
|
All Applicable Models
|
|
EA77 39 050
|
No. 2 Engine Mount Rubber
|
All Applicable Models
|
|
EA79 39 020
|
No. 2 Engine Mount Bracket
|
All Applicable Models
|
|
9YA02 1215
|
Bolt (for No. 2 Engine Mount)
|
All Applicable Models
|
|
B455 39 070D
|
No. 4 Engine Mount Rubber
|
JM1BG****L0100001 - L0180133
|
|
B61N 15 202A
|
Lower Radiator Mounting Bracket
|
JM1BG****L0100001 - L0186253
|
NOTE:
Refer to the vehicle VIN when ordering applicable parts,
WARRANTY INFORMATION
(Applies To Verified Customer Complaints On Vehicles Covered Under
Normal Warranty. Refer To The SRT Microfiche For Warranty Terms)
- Warranty Type:
-
A
- Symptom Code:
-
83
- Damage Code:
-
97
- Part Number Main Cause:
-
B456 39 040C, B455 39 070D, B61N 15 202A or EA77 39 050
- Operation Number:
-
XX0731R1 / 0.9Hrs (JM1BG***R0999999 and lower)
XX0731R2 / 0.9Hrs (JM1BG****L0186253 and lower)
XX0731R3 / 1.2Hrs (JM1BG****L0180133 and lower)
XX0731R4 / 0.9Hrs (92-94 MX-3 and vehicles lower than JM1BG****S0100000)   There are 4 repair procedures depending on the vehicle  VIN
|
Part Number
|
Operation Number
|
|
XX0731R1
|
XX0731R2
|
XX0731R3
|
XX0731R4
|
|
B456 39 040C
|
X
|
X
|
X
|
|
|
B1Y2 39 010
|
X
|
X
|
X
|
X
|
|
9YAO9 1205
|
X
|
X
|
X
|
X
|
|
9YB04 1207A
|
X
|
X
|
X
|
X
|
|
EA77 39 050
|
X
|
X
|
X
|
X
|
|
EA79 39 020
|
X
|
X
|
X
|
X
|
|
9YA02 1215
|
X
|
X
|
X
|
X
|
|
B455 39 070D
|
|
X
|
X
|
|
|
B61N 15 202A
|
|
|
X
|
|
Copyright © Mazda North American Operations