TSB: U004/96
POOR A/C PERFORMANCE
AFFECTED MODELS
1996 Protege with a 1.5L engine.
DESCRIPTION
Some vehicles may experience poor A/C system performance. This
concern is caused by reverse polarity at the condenser fan.
If
a customer complains of poor A/C performance, follow the inspection and
repair procedure listed in this bulletin. Dealership PDI personnel
should include the following inspection and, if necessary, repair
during the PDI process.
INSPECTION PROCEDURE
1. Open hood.
2. Confirm that a "RED" mark is applied to the top of the
white OEM hood rod retaining bracket.
-
If the "RED" mark is present, the condenser fan wiring has
been
already corrected. Refer to the workshop manual for troubleshooting
information.
-
If the "RED" mark is not present, proceed to step 3.
3. Start engine and turn A/C on.
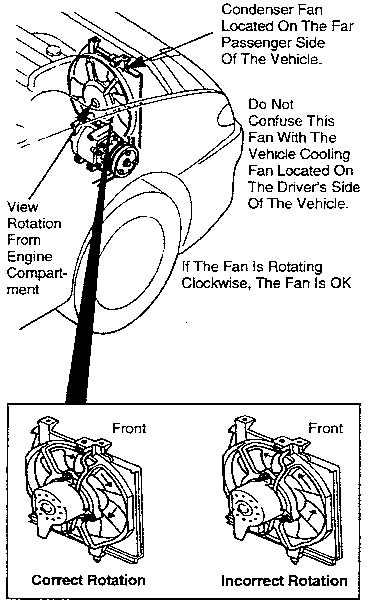
4. Turn A/C off and confirm rotation direction of the
condenser fan.
-
If the fan blades are turning clockwise, the condenser fan
wiring is not the problem. Refer to the workshop manual for
troubleshooting information.
-
If the fan blades are turning counter-clockwise, proceed to
the Repair Procedure section of this bulletin.
NOTE:
-
Fan rotation direction (clockwise or counterclockwise) is
the
direction the fan is turning when viewed from the rear of the engine
compartment.
-
Fan direction can also be confirmed by placing your hand
over
the far passenger side opening in the front grille. If air is forced
outward, the fan rotation is counter-clockwise. If air is being sucked
inward, the fan rotation is clockwise.
Fig. 1
REPAIR PROCEDURE
1. Remove the upper seal board above the hood latch by
disengaging six (6) plastic screw clips.
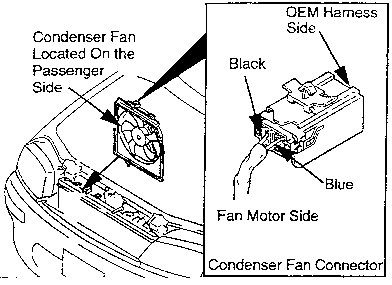
2. Locate the back of the condenser fan connector (G3-03) (
not vehicle harness) located at the top of the fan shroud
condenser side.
3. Confirm that the passenger side wire is "BLACK" and the
driver's side wire is "BLUE."
4. Disconnect the condenser fan vehicle harness from the
condenser fan connector. Fig. 2
5. Disengage the connector retainer clip at the top of the
fan shroud and pull the connector away from the shroud.
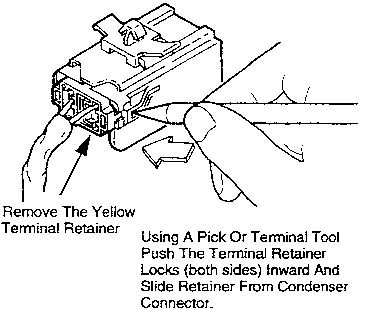
6. Disengage the yellow terminal retainer from the
condenser connector. Slide the yellow retainer approximately 1/4 inch
from condenser connector. Fig. 6
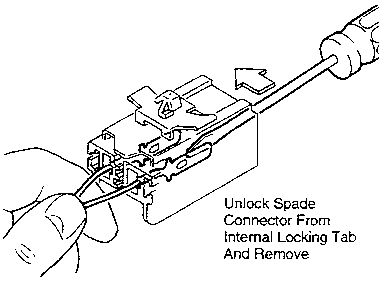
7. Use a pick or a terminal tool to remove the terminals
from the condenser connector. Fig. 4
8. Slide the "BLACK" and "BLUE" wires out of the yellow
terminal retainer.
9. Insert the "BLACK" and "BLUE" wires through the yellow
terminal retainer in the correct position.
10. Insert the "BLACK" and "BLUE" wires into the back of
the condenser connector and click into place.
11. Install the yellow terminal retainer into the condenser
connector.
12. Hold the condenser connector and lightly tug on the
wires to confirm they are installed securely.
13. Install the condenser connector onto the fan shroud.
Fig. 5
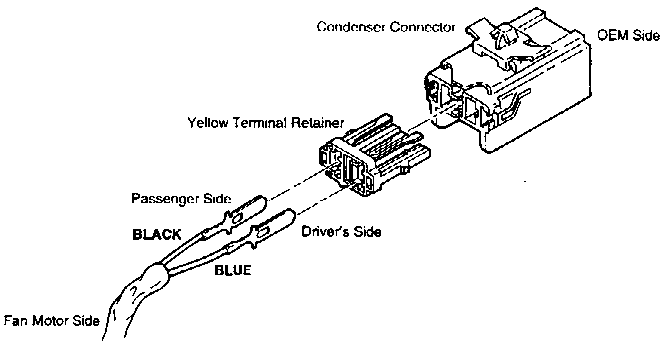
14. Connect the condenser fan vehicle harness to the
condenser fan connector.
15. Install the upper seal board.
16. Verify repair by confirming fan rotation.
17. Use a RED permanent marker to place a mark on the top
of the hood rod retaining bracket.
NOTE: Fan should rotate in a
clockwise direction when viewed from the back of the engine
compartment.
PARTS INFORMATION
Parts
personnel should check dealerstock of A/C kits (BC1C-61-410A) with a
serial number from 960308 to 960610. The serial number is located on a
"WHITE" label on the evaporator housing. Check the condenser fan wiring
prior to installation. Refer to Figure 5 for correct wire location.
WARRANTY INFORMATION
(Applies To Verified Customer
Complaints On Vehicles Covered Under Normal Warranty. Refer To The SRT
Microfiche For Warranty Term Information.)
- Warranty Type
- A
- Symptom Code
- A1
- Damage Code
- AA
- Part Number Main Cause
- Z501-15-035
- Quantity
- 0
- Operation Number
- YY109XRX
- Labor Hours
- 0.2 Hrs.
Copyright © Mazda North American Operations